18th Century Linen Mitts – Research

the haymakers.jpg
The Haymakersdetail by George Stubbs, 1785

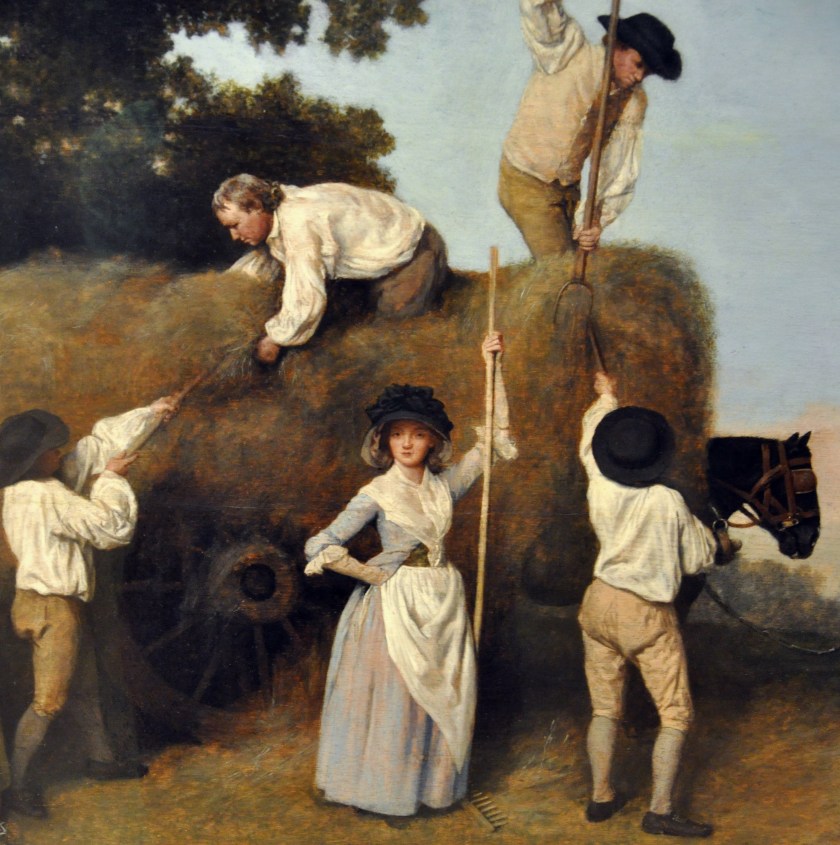
Last weekend I had a lovely time at Fort Dobbs participating in their War for Empire French and Indian living history weekend. I learned about 18th century shoemaking and tailoring, visited with friends, tried my hand at log hewing (not so easy in stays!), and soaked up some North Carolina sun – perhaps too much sun. Yup, it was inevitable that the pasty white ghost would get a sunburn after being sequestered in six months of darkness up North. Thankfully all of those 18th century clothing layers and wide brimmed bonnets protected the majority of my lily skin, but my exposed forearms turned a nice shade of tomato. 

Fort Dobbs wood chopping
The camp follower before the sunburn.

After that happened, the obvious question was, “What is the 18th century solution to this problem?” Of course sunscreen is a perfectly viable (21st century) option, but I don’t like to have to carry around and conceal modern items and I usually forget to reapply it enough anyways. Thankfully there is a period alternative that solves my problem: linen mitts.

If you follow @girloncampaign on Instagram you might have seen my posts about my knitted wool mitts I made. Those, like other knit and sewn mitts of the 18th century, were constructed from wool, silk, or leather for warmth purposes, but I have also found references to linen mitts for sun protection. I hope to make a pair soon, but in the meantime I’d like to collect my primary source references and extant garments here for inspiration.
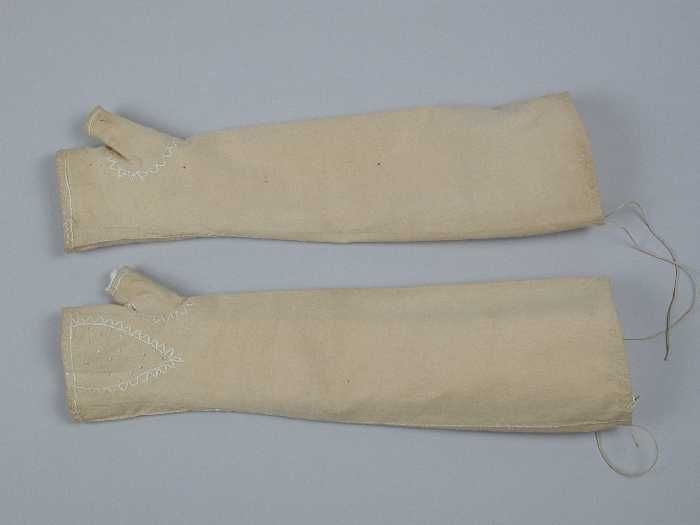
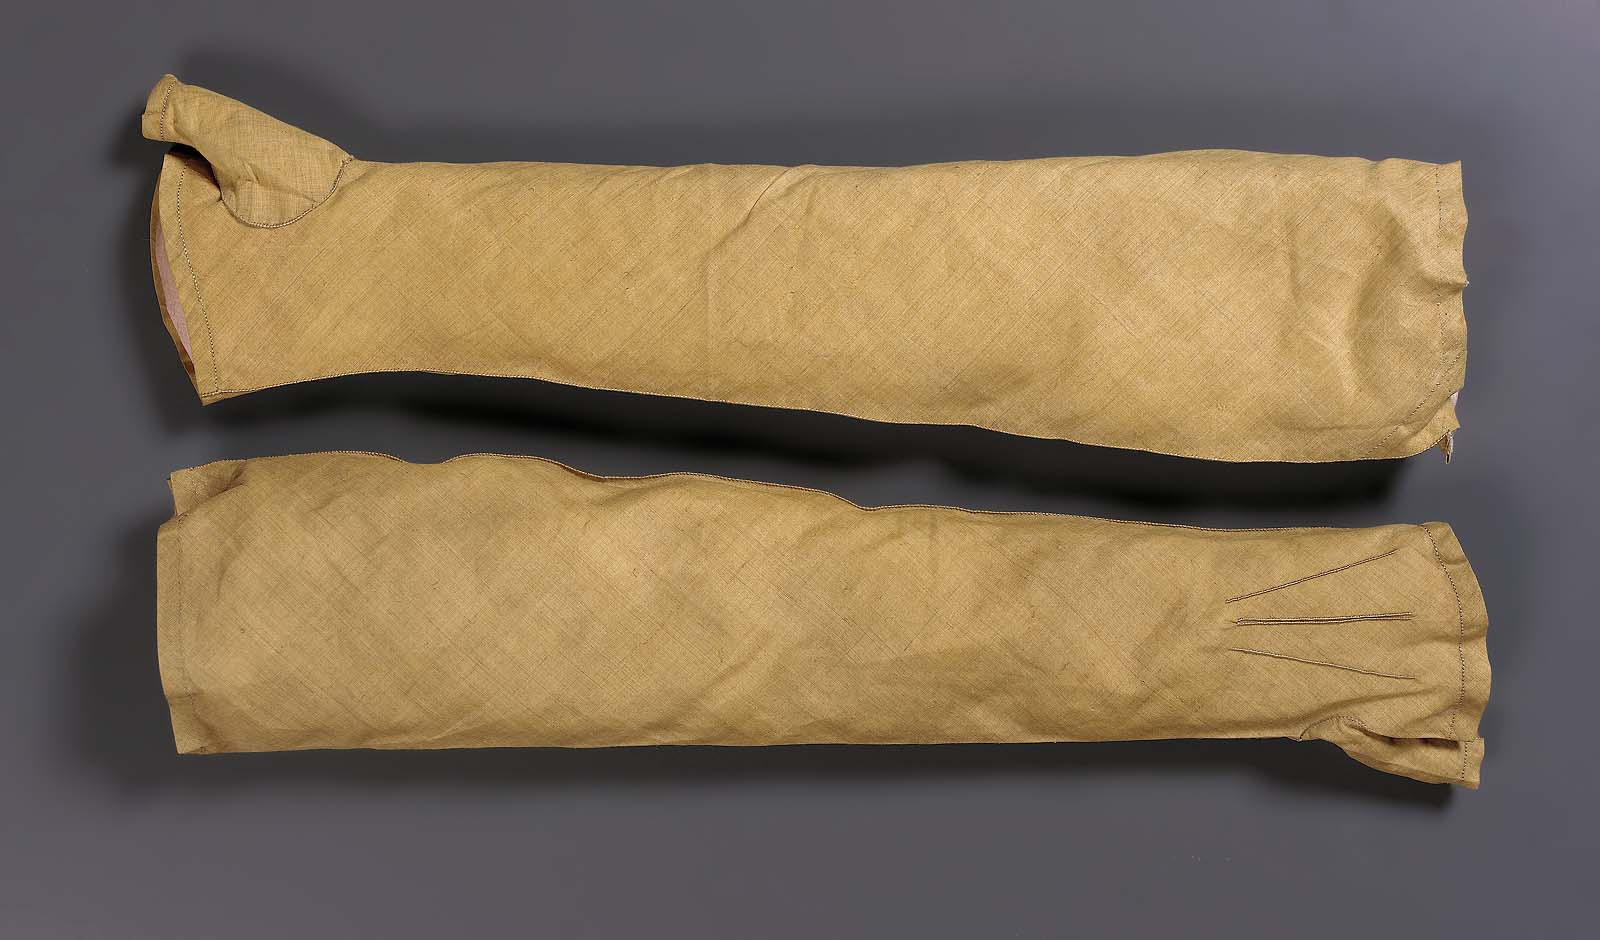
Extant garments:

linen mitts museum rotterdam
“Paar mitaines van ongebleekt linnen met wit borduurwerk op de rug” (Pair of mittens of unbleached linen with white embroidery on the back) Museum Rotterdam, accession #20890-1-2
linen mitts MET C.I.44.8.9a, b
Linen mitts, probably European, The MET, accession #C.I.44.8.9a, b
linen mitts MFA 43.1968a-b.jpg
Pair of light brown linen mitts, Museum of Fine Arts, accession #43.1968a-b

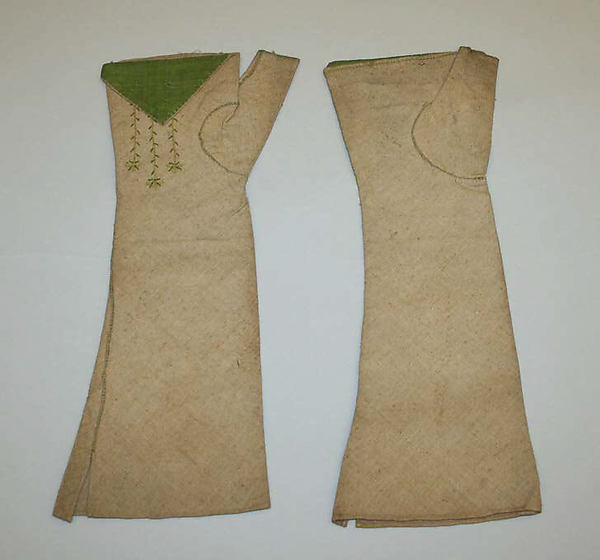
An earlier pair of mitts believed to have been made in India for the western market. Linen plain weave with silk embroidery. LACMA, accession #M.80.43.4a-b

A later pair of mitts, MET, accession #2009.300.1685a, b

Primary references: 

The Proceedings of the Old Bailey: Elizabeth Clemens, William Smith, 9th December 1761, reference #t17611209-8:

“Elizabeth Clemens, otherwise Smith, was indicted for stealing…two pair of white thread mitts, value 2 s.”

The Proceedings of the Old Bailey: Samuel Lane, Esther Lamb, 10th January 1781, reference #t17810110-30:

“Samuel Lane and Esther Lamb were indicted for stealing…two pair of linen mitts, value 6 d.”

The Proceedings of the Old Bailey: Henry Abel, 22nd February 1781, reference #t17810222-29:

“Henry Abel was indicted for stealing…two pair of linen mitts, value 5 s.”

“Wives, Slaves, and Servant Girls” by Don N. Hagist, entry # 316:

“She stole and carried off with her…one pair of white cotton mitts.”

Based on what I’ve unearthed so far, linen mitts seem predominantly to be made from white or unbleached fabric, but constructed in a similar manner to silk or wool fabric mitts. I plan on constructing my own pair, but Penny River makes lovely recreations for those inclined to purchase a ready made pair.

Various patterns are available:

Larkin & Smith Mitt Pattern

“Costume Close Up:  Clothing Construction and Pattern 1750-1790” by Linda Baumgarten, pg. 72-74 (the pattern is also available for free without the construction notes on the Making History blog)

“The American Duchess Guide to 18th Century Dressmaking” by Lauren Stowell & Abby Cox, pg. 60-63

Quilted Petticoat

Quilted Petticoat ( https://thefarmingdaughter.com/2016/08/11/quilted-petticoat/) 3

It only took me 1 1/2 years to sew and 1 1/2 years to blog about, but here is my quilted wool petticoat! In 2013 I met a lovely lady named Judy at the Genesee Country Village Civil War reenactment. During a rainstorm I ducked into George Eastman’s (the founder of Kodak) boyhood home where Judy was demonstrating hand quilting. She kindly offered me both shelter and a lesson in her craft! I had a most enjoyable time and decided to start my own quilting project after the reenactment.

I determined on making a quilted petticoat because: 1.) I already had the wool flannel fabric I needed, 2.) I always get cold at events, and 3.) A petticoat is hidden under your skirts so no one would see my beginner stitches 😀 I was inspired by the quilting design on this original silk quilted petticoat from thegracefullady.com:

(from thegracefullady.com)

(from thegracefullady.com)

I decided on 3 horizontal quilting lines at the bottom of the petticoat, a chunk of shell design, 3 more horizontal lines, then the diagonal lines. The main body on my petticoat is three layers: red wool flannel from fabricmartfabrics.com, wool batting, and a cotton sateen lining. I almost wish I had used polished cotton and silk taffeta. It would have been more expensive, but for the amount of work that went into the petticoat it would have been worth it.

I couldn’t really tell from the photos how high the diagonal quilting lines went on the original petticoat, but I had decided to make my petti with a cotton yoke (to reduce bulk) so I made the lines extend all the way up the main body. The wool batting only goes up 2/3 of the body and is a sheet of batting peeled apart to make a thinner layer (I think separated once, and then separated once again to make the batting 1/4 of its original thickness). The yoke is a straight yoke, meaning it is the same circumference as the body of the petticoat (90″).

Before I could begin quilting I partially assembled the petticoat. I sewed 1.5 panels of the 60″ wide red wool flannel together to make a tube 90″ in circumference. I then sewed the cotton sateen on the bottom edge of the petticoat, right sides together, lapping the edges and sewing the last side seam when I reached the end (just like sewing on a faced hem). I laid the red flannel on my ironing board, right side down, and spread my thin layer of batting over it. Then I smoothed up the sateen lining on the wrong side, sandwiching the batting between the two layers of fabric. Using large, sloppy stitches I basted all over the petticoat to hold the three layers in place while I quilted.

To mark the quilting design I used an air and water dissolving marking pencil. I cut the shell pattern out of a sheet of plastic quilting template and just used a ruler for the horizontal and diagonal lines. Since my pencil lines would dissolve after being exposed to the air for awhile I only marked out the section of quilting as I was working on it. I used a large embroidery hoop to hold the petticoat as I was quilting. I chose to go with a contrasting colored thread and used black hand quilting cotton thread that I lightly waxed with bee’s wax. I found a thimble most indispensable!

Since this was my first hand quilted project you can actually see the progression of how my stitches got smaller and neater as I went on.

Quilted Petticoat ( https://thefarmingdaughter.com/2016/08/11/quilted-petticoat/) 5

Quilted Petticoat ( https://thefarmingdaughter.com/2016/08/11/quilted-petticoat/) 6

After the quilting was finally done, I attached the straight yoke, hand gathered the waist, attached and hand finished the waistband, and put in a buttonhole and china button.

I might still add some wool hem tape to protect the bottom edge and also reset the waistband since I made it (as usual) too large. Overall though I’m quite pleased with the finished results! The wool does a beautiful job insulating and blocking the wind, but since it’s a natural fiber the petticoat is still comfort to wear up to the mid 60s. The three layers and the quilting give the petticoat a nice fullness and when worn under a dress your skirts have that lovely “boof” of the period. Thank you again to Judy for teaching me this practical and beautiful skill!

Quilted Petticoat ( https://thefarmingdaughter.com/2016/08/11/quilted-petticoat/) 7

Fabric: wool flannel, wool batting, cotton sateen, pima cotton

Notions: black cotton quilting thread, 1 china button

Pattern: drafted my own

Year: 1840s-1860s

Notions: white cotton thread, black cotton quilting thread, white china button

How historically accurate is it?: The petticoat is constructed using period techniques and the quilting design is taken from an original petticoat. It might have been a tiny bit more accurate to use polished cotton instead of cotton sateen, but I’m satisfied with the authenticity.

Hours to complete: I did the quilting over a period of 1 1/2 years so I have no idea. It’s probably in the 150-200 hour range.

Total cost: about $50

First worn: Snowshoeing in my Civil War garb, and then at the 150th Appomattox reenactment

-Michaela, “The Farming Daughter”

The “Bess” Bonnet


The Farming Daughter: The "Bess" Bonnet ( https://thefarmingdaughter.com/2016/01/13/the-bess-bonnet/)

And still of a winter’s night, they say, when the wind is in the trees,

When the moon is a ghostly galleon tossed upon cloudy seas,   

When the road is a ribbon of moonlight over the purple moor,   

A highwayman comes riding—

         Riding—riding—

A highwayman comes riding, up to the old inn-door.

Over the cobbles he clatters and clangs in the dark inn-yard.

He taps with his whip on the shutters, but all is locked and barred.   

He whistles a tune to the window, and who should be waiting there   

But the landlord’s black-eyed daughter,

         Bess, the landlord’s daughter,

Plaiting a dark red love-knot into her long black hair.

-“The Highwayman” by Alfred Noyes

The nasty weather we’re having right now has at least one benefit I suppose…inspiring me to finally blog about my new quilted winter hood!

I began this project the beginning of October. I’d actually owned the pattern unused since last year, but I pulled it out hoping to whip up a hood before the Cedar Creek reenactment. Of course that didn’t happen, but c’est le vie. (Actually it’s more my procrastinating self’s fault, when will I learn?)

I used Anna Worden Bauersmith’s Quilted Winter Hood pattern. The pattern offers a regular size and one with a deeper brim. I went with the regular size. I’ve made various winter hoods before, but I love that this particular pattern is less utilitarian in shape and is instead modeled more like the fashion bonnets of the era. The pattern was clear and easy to understand, though I would have liked a few marks or notches to help match the pieces when sewing the bavolet to the crown.

The lining is a cream colored cotton sateen and the batting is wool. For the main fabric I chose a simple and versatile black silk taffeta. I made the bow and ties also from silk taffeta I had on hand. They are just tacked on to the bonnet, so if I get tired of them they can be easily switched out for a fresh color. I discovered the poem The Highwayman by Alfred Noyes while working on this project and didn’t realize until later that I unconsciously made the bonnet from two colors specifically mentioned in the poem!

“Bess, the landlord’s daughter,

Plaiting a dark red love-knot into her long black hair.”

For that reason I’ve decided to name it my “Bess” bonnet. 🙂

Using some suggestions offered in the pattern and inspiration from Sarah Jane’s version, I came up with a quilting design that pleased me. I quilted it all by hand. At first I didn’t plan on the final row of shell pattern closest to the brim, but I’m glad I added it because I think it balances out the design nicely.

The Farming Daughter: The "Bess" Bonnet ( https://thefarmingdaughter.com/2016/01/13/the-bess-bonnet/) 2
Quilted crown design
The Farming Daughter: The "Bess" Bonnet ( https://thefarmingdaughter.com/2016/01/13/the-bess-bonnet/) 3
Koda “helping” me quilt
The Farming Daughter: The "Bess" Bonnet ( https://thefarmingdaughter.com/2016/01/13/the-bess-bonnet/) 4
Hand quilting

The crown is stiffened with wire to help it hold its shape. The pattern recommends “20 gauge millinery wire”. I honestly have no idea how big that is, so I just used some jewelry wire we had laying around and it seems to work fine.

The Farming Daughter: The "Bess" Bonnet ( https://thefarmingdaughter.com/2016/01/13/the-bess-bonnet/) 5
A look inside the hood: all of the raw seams joining the pieces together are finished with a whip stitch
The Farming Daughter: The "Bess" Bonnet ( https://thefarmingdaughter.com/2016/01/13/the-bess-bonnet/) 7
Back view

I would definitely recommend this pattern to someone looking for a more refined, fashionable winter hood. The research and clear instructions are wonderful. I was a little leery of the price…$20. I thought that was a little much for a pattern that is basically only three pieces…but then again, the price didn’t dissuade me from purchasing the pattern when I did! I think the printing costs contributed to the higher price and I see that Anna now offers the same pattern as a digital download for the very reasonable price of $7 (you can buy it here). These hoods use so little material now that I have the investment of the pattern already I can see myself making quite a few in different colors!

The Farming Daughter: The "Bess" Bonnet ( https://thefarmingdaughter.com/2016/01/13/the-bess-bonnet/) 6
The three main pieces: crown, tip, and bavolet

Overall, I’m very pleased with my finished Bess bonnet. I think proper accessories can really help to complete the believable “look” of the period…and they’re great conversation starters with the public! I also love how this piece can easily be incorporated in a wide range of personas. Of course the shape and materials are fine enough for a more well to do impression, but it requires so little fabric that an enterprising farm wife could have easily afforded the small bit of silk required to make herself a nice winter Sunday piece of headwear.

I’ll be excited for the next cold weather event so I can try out my new winter hood! Have you ever sewn a winter hood? Do you have a favorite piece of historic clothing or gear that transcends several social classes?

-Michaela “The Farming Daughter”

Just the basics:

Fabric: black silk taffeta from Originals by Kay, cream cotton sateen from Joann’s, red silk taffeta from Fabrics Universe on Etsy, wool batting

Notions: black cotton quilting thread, 2′ wire

Pattern: “Quilted Winter Hood” by Anna Worden Bauersmith (the pattern is for sale here in her shop)

Year: 1860s

How historically accurate is it?: Fairly good I’d say. The pattern is modeled after designs of original bonnets and all of the construction methods are period correct. The lining should possibly be a printed cotton or a polished cotton instead of cotton sateen. I’m quite pleased with the finished results though!

Hours to complete: 10 maybe?

First worn: Just to try on when finished

Cost: $5 (black silk taffeta), $3 (cotton sateen), $1.5 (red silk taffeta), $2( wool batting) $1 (notions-thread & wire), $20 (pattern)

Total cost (with pattern): $32.50

Total cost (without pattern): $12.50

Braveheart: Part II

Sewing a Braveheart Kilt Part II https://thefarmingdaughter.com/2015/03/02/braveheart-part-ii/

Yesterday I posted about the tunic I sewed for a friend’s Braveheart costume. Today I’ll share about the exciting part, the kilt!

(If you didn’t see yesterday’s post you can read it here.)

First I’ll say, there has probably never been a kilt quite like this one ever sewn before. The main object was to make the kilt look like the one William Wallace wears in Braveheart. The movie kilt is a version of the Feileadh Mor, or “Great Kilt”, which is traditionally a large piece of wool, 60 inches wide and up to nine yards long. Each time the garment is worn it has to be re-pleated and then belted around the waist. My objective was to sew a faux Feileadh Mor that didn’t need to be re-pleated each time it was worn, and that only used 3 1/2 yards of 54″ wide material. The good news is, I have a hunch that the movie kilt used some cheater tricks also.

Sewing a Braveheart Kilt Part II, the inspiration (https://thefarmingdaughter.com/2015/03/02/braveheart-part-ii/)
The inspiration picture from the movie

I settled on a design featuring a wrapped, pleated skirt and then a piece of fabric extending off the end to drape over the shoulder.

The fabric that I used was a gorgeous 8 oz. Scottish wool in the authentic Ancient Royal Stewart tartan design. I chose not to prewash the fabric because I didn’t want it to lose its finish or become fuzzy.

First I measured and cut the fabric, pulling a weft thread to make sure I was cutting on grain. Then I sewed the breadths together to make a piece 24.5″ wide and 270″ long, being careful to match the design of the plaid.

Sewing a Braveheart Kilt Part II, pulling a weft thread (https://thefarmingdaughter.com/2015/03/02/braveheart-part-ii/)
Pulling a weft thread for the cutting line

The wool was rather lightweight so we decided to line it with white Kona cotton to give it some body. I used “Mrs. Pullan’s Skirt Lining Technique” taken from the 19th century book Beadle’s Dime Guide to Dressmaking. To sew the lining you lay the fashion fabric and lining fabric wrong sides together, fold back the fabric to expose the first seam allowance, and join the two pieces together by sewing through the seam allowance (you can read a better explanation of the technique here). I didn’t use this method to be “authentic” or anything, but because it provides a tidy lining, with no raw edges or stitches showing.

Sewing a Braveheart Kilt Part II, the lining (https://thefarmingdaughter.com/2015/03/02/braveheart-part-ii/)
Mrs. Pullan’s Lining Technique

60″ inches of the wool was kept unlined to use as the part of the kilt that drapes over the shoulder.

Sewing a Braveheart Kilt Part II: the lining ( https://thefarmingdaughter.com/2015/03/03/braveheart-part-ii)
The lining

To finish the edges of the unlined part I hand sewed a narrow turned hem. For the lined part of the kilt I put in a faced hem. This technique uses only a 1/2″ of the fashion fabric, while giving body and weight to the bottom edge of the garment so that it will hang nicely. The facing was sewn on with the machine and then finished by hand so the stitches wouldn’t show on the right side.

Sewing a Braveheart Kilt Part II: ( https://thefarmingdaughter.com/2015/03/03/braveheart-part-ii)
The faced hem

I knife pleated the skirt and set it to a waistband, using a slip stitch to finish it off.

Sewing a Braveheart Kilt Part II: the waistband (https://thefarmingdaughter.com/2015/03/03/braveheart-part-ii/)
The wrong side of the waistband was slip-stitched for an invisible finish

The final step was to put in four wooden buttons and hand sewn button holes.

Sewing a Braveheart Kilt Part II: buttons (https://thefarmingdaughter.com/2015/03/03/braveheart-part-ii/)

Sewing a Braveheart Kilt Part II: button holes (https://thefarmingdaughter.com/2015/03/03/braveheart-part-ii/)
Hand sewn button holes, the bane of my existence 😛
Sewing a Braveheart Kilt Part II: hand sewn button holes (https://thefarmingdaughter.com/2015/03/03/braveheart-part-ii/)
Thankfully I think they turned out neatly enough

It’s a good thing we didn’t order any less fabric, because this was all that was left:

Sewing a Braveheart Kilt Part II: remaining fabric (A Weekend of Polite Society)
Only this little scrap was left!

Some pictures of the completed kilt:

Sewing a Braveheart Kilt Part II: the completed kilt! (https://thefarmingdaughter.com/2015/03/03/braveheart-part-ii/)
The completed kilt!
Sewing a Braveheart Kilt Part II: the completed kilt (https://thefarmingdaughter.com/2015/03/03/braveheart-part-ii/)
The completed kilt showing the shoulder piece

The completed costume in use:

Sewing a Braveheart Kilt Part II: the kilt in use! (https://thefarmingdaughter.com/2015/03/03/braveheart-part-ii/)

Fabric: 8 oz. lightweight Ancient Royal Stewart Tartan wool, 100% Kona cotton

Pattern: Drafted my own

Notions: Cotton thread, 4 wooden buttons

How historically accurate is it?: Not accurate at all, but it looks like the movie kilt, so it’s perfect! 🙂

Hours to complete: Maybe 20?


-The Farming Daughter

Braveheart: Part I

braveheart 1 pinnable

Recently, I finished sewing a neat project for my friend Stewart. Stewart has Scottish ancestors and is a fan of Braveheart, so he asked me to make a kilt and tunic similar to the one William Wallace wears in the movie. It was fun sewing a “costume” that didn’t have to be 100% authentic for a change. This post will be focus on the tunic, and part two will show the kilt construction and completed outfit.

I had just enough cotton material left over from constructing the kilt that I thought I could squeeze out a tunic. It was difficult to find any clear pictures from the movie of just the tunic, so I decided to base it off of the Bocksten Tunic. This style of tunic is accurate for the 13th-14th centuries (when William Wallace was alive), and is cut to use fabric economically (which was good since I didn’t have much material).

The cotton fabric I had was white, so I used tea bags to dye it a more “natural” color. I boiled a big pot of water, and steeped about thirty of the cheapest tea bags I could find. Then I submerged the fabric in the dye and let it soak until I thought the color was dark enough. To prevent the color from being mottled I made sure to frequently stir and turn the fabric so all of the material who absorb the dye evenly. Finally, I wrung the extra tea out and dried the fabric in the dryer on high to “set” the dye.

I drafted my own pattern, using this tutorial as a guideline. I took measurements off a T-shirt to give me a general idea on sizing.  The tunic is a very simple style, with two big rectangles as the front and back.

Braveheart Tunic Front (https://thefarmingdaughter.com/2015/03/02/braveheart-part-i/)


Since I didn’t have much material I had to piece three rectangles together for the back.

Sewing a Braveheart Tunic Back View (https://thefarmingdaughter.com/2015/03/02/braveheart-part-i/)


The sleeves are elbow length and are made of tapered rectangles with square gussets.

Sewing a Braveheart Tunic Sleeve View (https://thefarmingdaughter.com/2015/03/02/braveheart-part-i/)


A triangular gore is added to each side of the tunic to add width. The gore also had to be pieced due to my small amount of fabric.

Sewing a Braveheart Kilt Side Gore (https://thefarmingdaughter.com/2015/03/02/braveheart-part-i/)


I drafted the keyhole neckline facing following the instructions from this tutorial.

Sewing a Braveheart Kilt Neckline (https://thefarmingdaughter.com/2015/03/02/braveheart-part-i/)

Since authenticity wasn’t a big issue, I used the sewing machine for all of the seams except for the slip stitch on the neckline. The bottom of the tunic and sleeve edges have a narrow turned hem. All of the seams, except where the sleeves are set in, are flat felled for durability.

The basic stats:

Fabric: White Kona cotton dyed using tea

Pattern: Drafted my own pattern using this tutorial as a guideline, and this tutorial for the neckline

Notions: Thread, tea bags to dye the fabric

How historically accurate is it?: The tunic is patterned after the Bocksten Tunic, and has a shape and design appropriate for the 13th-14th centuries (when William Wallace was alive). I used the machine to sew it though, which is not accurate in the least 🙂

Hours to complete: 6 maybe??? (not including the fabric dyeing)

Stay tuned for Part II: The Kilt! (And don’t worry, I haven’t forgotten the cow care post. I just want to get some pictures to illustrate what I’m talking about and then I’ll post, hopefully by the end of this weekend.)

-The Farming Daughter